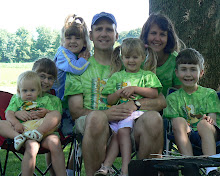
We're going to Disney World to see the Mouse and of course we want to be ready for all things Disney which means new t-shirts. Being the planner/neurotic mother that I am, I wanted all of us to wear matching t-shirts for at least one of the days we would be at the Magic Kingdom. This makes it easier for me to keep track of everyone since there's a lot of us.
Disneystore.com had just what I was looking for. Well sort of. Don't worry, I'm not going to make Trent and Ben wear Minnie Mouse shirts-I got them Mickey Mouse in the same style. Anyway, they had these cute Mother/Daughter shirts on sale (plus I received cash back by buying through ebates) and so I bought one for me and the girls. Macy is modeling one of the girl's shirts. Semi-fitted, capped sleeved, very cute. Then there's mine:
 Uh, yeh. This was not the look I was going for. The fit was okay, but not great. It felt too big, while at the same time, almost too snug. It felt hot and yucky and I kept wanting to pull at the neck and I wasn't even in the Florida heat and humidity yet! I knew there was no way a smaller size would solve the problem. It was time for some t-shirt transformation.
 First I needed a t-shirt pattern that fit well and one that I liked. I had tried unsuccessfully at making a perfect t-shirt using the Jalie 2005 pattern. A lot of people liked it, but I just never did. I changed my version so much it didn't even resemble the original and even then I wasn't crazy about how it felt or looked on me. I had been wanting to try this Stretch and Sew pattern ever since I bought it (a long time ago!) but had been feeling discouraged by my failed attempts at the Jalie pattern. I had an old t-shirt just waiting to be cut apart and here's the result:
 Much better! The neck's a little small because I wanted to use the ribbing I had from the original shirt and I really could have used a bit more, but this was more of what I wanted. So it was time to see what I could do with the original Minnie shirt. It turns out, that the parts of the shirt that felt too snug did not provide enough fabric to cut out a new shirt, so I had to purchase a much larger shirt to get my new shirt cut out. Behold the loveliness:
 I first washed and dried the shirt to take care of any shrinkage that might occur. Since the shirt I was making was fitted, I didn't want to do all that work, just to have it turn out too small after I washed it. I then carefully cut apart the shirt at the seams, saving all the parts.
 I laid out the sleeve pattern over the top of the sleeves. I decided I didn't want to re-hem the sleeves, so I used the existing hem even though it meant my sleeves wouldn't be as capped. I was okay with that.
 I folded the front in half and laid the front pattern piece on top. Since the neckline on the pattern was much lower, I cut it much higher to accommodate the graphic on the front.
 Here's the picture of the back.
The only piece that I didn't cut down was the neck ribbing as I had accidentally cut it while trying to open up my package and so I just used what I had. If I needed to, I was going to cut apart the first shirt to use the neck ribbing, but it turns out I didn't need to.
 After sewing up the shirt, I liked the fit much better, but was not happy with the neck. It made the whole shirt feel "off" for me. Part of the problem was my ribbing was just a bit too short and I really had to pull it to make it around the neck. I also really wanted a bit of a bigger neck as this one felt very similar to the first shirt I had tried on.
 After a bit of ripping out and readjusting I had a better fitting neckline which made the shirt feel better. Don't ask me why, it just did.
 Here's a picture of the shirts side by side so you can see the difference in the neck. Not a lot, but enough that the final product on the right looks and feels better.
So you can see how much better the final product looks compared to the first shirt, here they are side by side:

 Here are all the shirts I've made using this pattern. I've been playing around with different neck finishes and sleeve types. I'm still having trouble making a truly capped sleeve, but I'm working on it. Can't wait to try the long sleeved and sleeveless versions as well!
(Just so you know-I don't get any kickbacks from the above links. They're just there so you can click through if you're interested!)